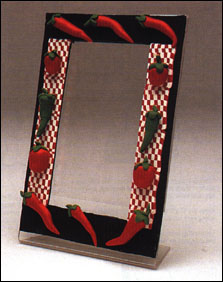
| Hot Chile Peppers Acrylic Frame Cover Spice up an ordinary acrylic frame using red and green peppers. Materials:
|
 |
Directions:
| 1. | Using the acrylic picture frame as a guide, trace around it on whit copy or typing paper. Using a ruler, measure in from the edge 1/2" around the entire perimeter. Mark this second rectangle inside the first You will use this as your guide, and to bake upon. |
| 2. | Condition block of black clay. Roll it on a #2 setting. Cut strips the length and width of the rectangle marks. Carefully lay this "frame base" over the paper pattern. |
| 3. | You may "butt" the frame's corners or "miter" them. |
| 4. | Using white and black clay, create a checkerboard cane. Cut 1" squares of clay which have been rolled to 1/8" thickness. |
| 5. | Stack 6-8 slices one atop the other. You will have a whlte or black on the bottom of the stack, and the opposlte color on the top. |
| 6. | Press the 1" x 1" x 1" cube of slices firmly together taking care not to distort. |
| 7. | Let the clay cube rest and cool. Then, carefully slice the cube into six equal pieces. |
| 8. | Reassemble the slices, flipping every other one to create the checkerboard design. Carefully, roll and smooth the cane, maintaining its square shape. Pull gently with the fingers as you reduce. Since the cane is already quite small, distortion will be kept at a minimum. After cane has rested again and cooled, cut thin slices with a tissue blade and place upon black clay frame base. Roll lightly with a brayer to smooth seams. Trim outside and inside with tissue blade if necessary. |
| 9. | Using the red clay, pinch small pieces off and roll into a tapered cone shape. Pinch and bend into a chile pepper shape. |
| 10. | Next, flatten a piece of the lime green clay. Using thin coils (or a cloverleaf cutter), fashion the "pepper top" and the stem of the pepper. |
| 11. | Place 4-6 peppers around frame boundary. Bake at 275°F for 15 minutes per 1/4" of thickness. Based on size of chile peppers, this should take 25-30 minutes. After frame cools, aflix to acrylic frame base using Super Glue, E6000, or Goop. |
Basic
Instructions for Working with Polymer Clay:
| • | Work clay on marble, glass, formica, lucite, aluminum foil, butcher's paper, or baking parchment. Avoid direct contact with wooden or fine furniture. |
| • | Once you have dedicated a household item to clay use, do not re-use it for food preparation. |
| • | Clay will form a residue on your hands. Use isopropyl alcohol, baby oil, Handi-Wipes, or Windex soaked paper towels to break up resldue, then soap and water. |
| • | Work from light to dark, cleaning tools frequently with Handi-Wipes or Windex soaked paper towels to prevent contamination of lighter colors. |
| • | Polymer clay bakes to a hard, bisque type finish at 275۰F (135°C). Clay items should be baked for 15 minutes per 1/4" of thickness. Use an oven thermometer lo check your oven's accuracy. With toaster ovens set them 20° lower as the items are closer to the heating elements. Check for discoloration as items cure/bake. |
| • | If an item does burn, avoid breathing the fumes! Open windows and air the space out thoroughly. |
| • | When sanding cured clay items, wear a mask use weVdry sandpaper and sand under running water. |
| • | Many specialized tools are available. But, your hands alone will serve |
Many specialized tools are available. But, your hands alone will serve you well!