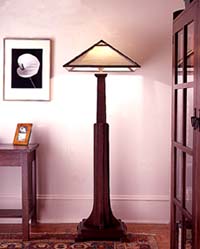
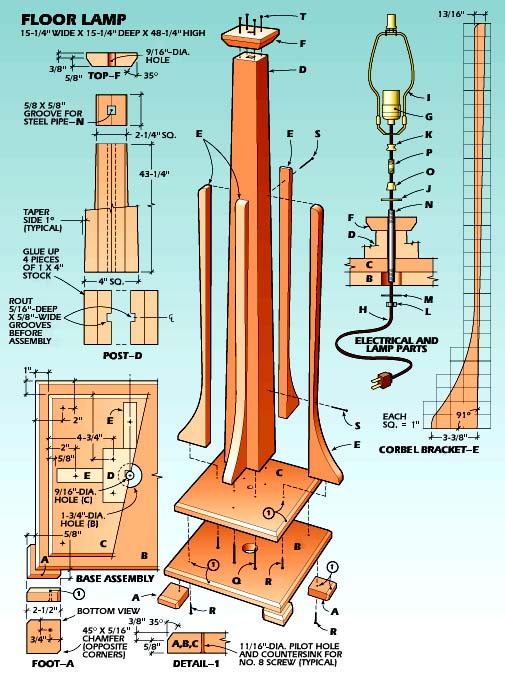
Floor Lamp
Distinctive corbel supports and a wide, stable base mark our lamp design.
BY NEAL BARRETT
This substantial floor lamp was designed to tastefully complement our rocker, bookcase and side table. It's just the right height to shed light on your reading material as you rock away in peace and quiet. It also casts plenty of light elsewhere, so you can use it as a good source of ambient illumination. But you don't have to build all the other pieces in this collection to make use of this lamp. It can certainly hold its own in any eclectic furniture arrangement, especially if you choose a lampshade that works well with the surroundings.

The stained-glass lamp-shade we chose is an Arts & Crafts reproduction. It's available from John Haight Studios, 166 North St., Elgin, IL 60120, for about $300.

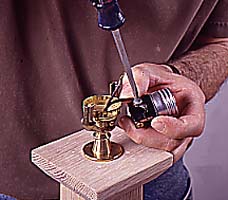
Scores of other shades are available at local lighting suppliers. Just be sure to match the harp you use in the lamp to the size needed for the shade you buy. When making your selection, keep in mind that the bottom of the shade should fall just below the bottom of the harp bracket.

Stock preparation

Begin by ripping the four post boards to size and crosscutting them 2 or 3 in. longer than the finished length. Spread glue on the mating surfaces of two of the boards, then clamp them together with their edges perfectly aligned. Repeat this process with the remaining two boards.

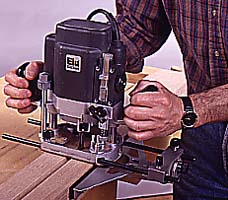
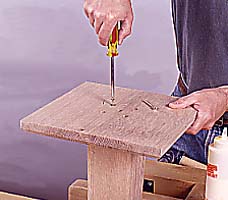
Set up the router with a 5/8-in. straight bit and an edge guide. Clamp one of the post halves between bench dogs, then rout a 5/16-in.-deep groove down the center of the blank (Photo 1). Repeat for the second post half. Then, crosscut each half of the post to finished length. Spread glue on the mating faces of the post halves, then clamp them together. Be sure to align the ends and edges of the post halves before setting the assembly aside.

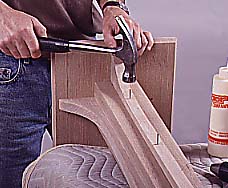
Lay out the post taper on two opposite sides of the blank, then use a band saw to make the cuts (Photo 2). Remember to keep the saw kerf to the waste side of the layout lines. Next, clamp the post between bench dogs and use a sharp plane to remove the saw marks and bring the taper right to the layout lines. Transfer the tapered profile to the other two sides and repeat the procedure to finish shaping the post. Sand the surfaces smooth.

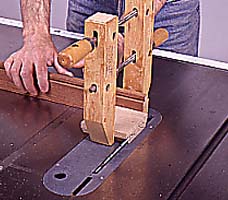
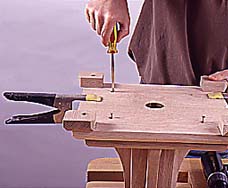
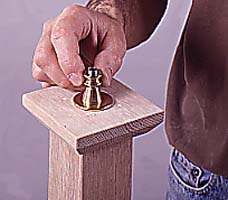
Cut the lamp top cap from a piece of 1-in.-thick stock, then use a table saw and miter gauge to cut a 35 
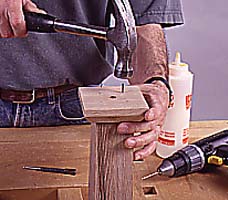
degrees bevel on all sides (Photo 3). Next, bore a 9/16-in.-dia. hole through the center of this cap and 
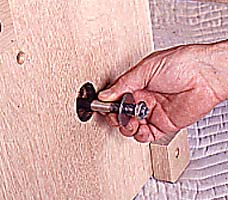
sand the piece smooth. Then place the cap on top of the post, adjusting it for an even overhang on all edges. Bore pilot holes for 6d finish nails, then apply glue and nail the cap in place (Photo 4). Set the nails below the wood surface and fill the holes with a stainable wood filler.

Glue two oversized blanks together for the base panels. You can use joining plates to align the boards while gluing them. Just be sure to keep the plates far enough back from the finished ends of the panels so they will not be exposed when you make the final cuts. After the glue cures on the panels, rip and crosscut them to size. Make sure that both panels are perfectly square. Use a table saw to cut the bevels around the panel edges. Bore a 9/16-in.-dia. hole in the center of the upper panel, then bore and countersink pilot holes for fastening it to the post. Sand this panel smooth, then use 3-in. No. 8 fh screws and glue to fasten this panel to the post (Photo 5).

Next, make a template for the corbel brackets from 1/4-in.-thick plywood or hardboard. After cutting out your template, hold it in place against the lamp post and base. Once you are satisfied with the fit, use it to trace the shape onto oversized blanks for the actual brackets. Clamp a blank between bench dogs, with the bracket outline overhanging the bench. Then, use a sabre saw to make the cut (Photo 6). Repeat the same process for each bracket. Sand all the brackets.

1--Rout a groove down the center for both halves of the lamp post. Use a 5/8-in.-dia. straight bit and a router edge guide.
2--Lay out the taper on opposite sides of the post. Then, cut off the waste with a band saw. Mark the other sides and cut them.
3--Cut the top cap to size, then use a table saw to cut a bevel on the bottom edge. Clamp the block to the miter gauge.
4--Bore a 9/16-in. hole through the top cap, then glue and nail the cap to the top of the post. Bore pilot holes for the nails.
5--Cut the upper base to size and bore a 9/16-in. hole through its centerpoint. Attach it with glue and screws.
6--Lay out the corbel shapes on a board. Then clamp the stock between bench dogs and cut the outline with a sabre saw.
Assembly

Place small guide marks on the post and base to indicate the locations of each bracket. Then apply glue to the back and bottom edges of each bracket and use 4d finish nails to pin them to the post (Photo 7), making sure to bore pilot holes and set the nailheads. Then bore and countersink pilot holes and drive one 1 1/2-in. No. 8 fh screw through the base into the bottom end of each bracket.

Cut the feet to size and shape, then bore and countersink pilot holes for attaching them to the lower base. Set the feet aside and bore a 1 3/4-in.-dia. hole through the center of the lower base panel. Then, bore and countersink pilot holes for fastening this panel to the upper base panel. Sand the panel smooth, mark the location of each base foot, then apply glue to the joints and fasten the feet with screws.

Clamp the lamp post upside down in the bench vise, then spread glue and position the lower base panel over the upper base panel. Adjust the parts for equal overhang on all edges. Then temporarily clamp them together and fasten the parts together with screws (Photo 8).

Installing lamp parts

Next, lay the lamp post on a padded table and slide the threaded steel pipe into the base hole (Photo 9). Before pushing the pipe all the way into the base, slip a washer over the end and thread on the steel nut. You can adjust how much the pipe protrudes past the top of the hole by tightening or loosening the nut. The pipe should extend about 3/8 in. beyond the top cap.

Place the brass check ring over the top end of the tubing, then thread on the tapered brass coupling. This fitting makes the transition between the 1/4 IP thread of the long pipe and the 1/8 IP thread of the steel nipple that connects the lamp fixtures. Next, thread the 1-in.-long steel nipple into the top end of the coupling. Allow this nipple to extend out of the coupling by about 3/4 in. Then place the tapped brass spindle over the nipple and tighten it against the coupling (Photo 10). The spindle will lock the nipple in place.

Push the lamp cord through the bottom of the steel pipe until it extends out the top of the nipple by about 3 in. Then feed the cord through the socket base and thread the base onto the nipple until it bottoms out on the harp bracket. Tighten the lockscrew on the base.

Connect the lamp cord to the terminals on the socket (Photo 11), and push the excess cord back down through the post so that the socket can sit firmly on its base. Then, snap the socket cover in place by pushing it down until you hear a click. Install the harp by compressing it and slipping each end into its bracket. Then, slide a locking ring over each bracket.

Before staining the lamp, apply masking tape to the parts for protection during the finishing process. Apply stain and finish, using the techniques described in "Rocking Chair." Once the finish has cured, remove the masking tape and install a bulb and lampshade. Our shade came unfinished, so we could match the finish on the rest of the piece (Photo 12).

7--Attach the corbel brackets to the post sides with glue and nails. Attach them to the base with screws driven from below.
8--Cut the feet and lower base to size. Then attach the feet-and join the two base pieces-with glue and screws.
9--Install a washer and nut on one end of the steel pipe, then slide it into the post's hole. Adjust the height by turning the nut.
10--Slide the brass check ring over the steel pipe. Then thread on the tapered coupling, steel nipple and brass spindle.
11--Slide the lamp cord through the pipe and thread the socket onto the nipple. Attach the wires to the socket screws.
12--The lampshade comes unfinished. Remove the glass panels, then stain and apply a finish to match the lamp base.


MATERIALS LIST––FLOOR LAMP

Key
No.
Size and description (use)
A
4
1 x 2 1/2 x 2 1/2" oak (foot)
B
1
1 x 14 x 14" oak (lower base)
C
1
1 x 12 x 12" oak (upper base)
D
1
4 x 4 x 43 1/4" oak (post)
E
4
1 x 4 x 30" oak (corbel bracket)
F
1
1 x 3 3/4 x 3 3/4" oak (top)
G*
1
3-way-turn knob socket
H*
1
10-ft. brown cord set
I*
1
10" harp (size depends on shade)
J*
1
1/4 IP x 1 1/2" brass check ring
K*
1
1/4 IP x 7/16" tapped brass
spindle
L*
1
1/4 IP steel hexnut
M*
1
1/4 IP x 1 1/2" steel washer
N*
1
1/2" O.D. x 46" steel pipe with 1/4
IP threads on both ends
O*
1
1/4 IP female x 1/8 IP female brass
tapered coupling
P*
1
1/8 IP x 1" steel nipple
Q
4
3" No. 8 fh screws
R
8
1 1/2" No. 8 fh screws
S
8
4d finishing nails
T
4
6d finishing nails
Misc: Yellow glue, 120- and 220-grit sandpaper, 0000 steel wool, aniline stain, tung oil varnish.

*Available as a kit ($31 plus s&h) from Shadee Lady & Lamp Shop, Northfield Common, 50 State St., Pittsford, NY 14534. Ask for SL-KIT No. NB.