| Side Table |
| A compact table with a generous
drawer on top and a wide-open shelf on the bottom. |
| BY NEAL BARRETT |
|
 |
|
|
This handsome table is a truly versatile piece of
furniture. Because of its compact size, you can use it
as an end table for a sofa or chair and even as a night
stand alongside your bed. But its sturdy design and
appealing lines make it work equally well as a console
table in the hallway or an occasional table in the
kitchen or bath.
Its utility, however, is only part of the story.
Though not as complicated as the rocker or bookcase in
our guide, this piece is nonetheless a challenging bit
of woodworking. From the mortise-and-tenon joinery that
holds the case together to the sliding dovetails that
join the drawer face to the drawer sides, much depends
on working carefully and precisely. But the rewards of a
job well done are well worth the effort. And the skills
that you develop--or refine--when building it will help
prepare you for any other table projects that may come
your way. | |
|
|
|
|
|
|
|
|
|

Нажмите для увеличения
|
|
|
|
MATERIALS LIST--SIDE TABLE |
|
Key |
No. |
Size and description (use) |
|
A |
4 |
1-3/4 x 1-3/4 x 25" oak (leg) |
|
B |
2 |
13/16 x 4 x16-1/4" oak (rail) |
|
C |
1 |
13/16 x 4 x 20-1/4" oak (rail) |
|
D |
2 |
13/16 x 2 x 16-1/4" oak (rail) |
|
E |
10 |
3/8 x 1 x 15-1/8" oak (slat) |
|
F |
1 |
13/16 x 8 x 19-7/8" oak (shelf) |
|
G |
2 |
5/8 x 4 x 15-7/8" oak (drawer guide) |
|
H |
1 |
1 x 20 x 24" oak (top) |
|
I |
1 |
13/16 x 3-15/16 x 18-3/8" oak (drawer face) |
|
J |
2 |
1/2 x 3-1/2 x 16-1/4" oak (drawer side) |
|
K |
1 |
1/2 x 3 x 16-3/4" oak (drawer back) |
|
L |
1 |
1/4 x 15-1/16 x 16-3/4" oak plywood (drawer
bottom) |
|
M |
2 |
1/4 x 3/4 x 15-13/16" oak (drawer guide
strip) |
|
N |
8 |
Knape & Vogt No. 1547STL tabletop fastener |
|
O |
1 |
Whitechapel No. 106STH2 drawer pull |
|
P |
8 |
1-1/4" No. 8 fh screws |
|
Q |
8 |
1" No. 8 fh screws |
|
R |
8 |
5/8" No. 8 fh screws |
|
S |
8 |
1/2" No. 6 fh screws |
|
T |
3 |
5/8" No. 6 rh screws |
|
U |
8 |
3/4" x 16-ga. brads |
|
V |
16 |
No. 20 joining plates |
|
Misc: Yellow glue, 120- and 220-grit
sandpaper, 0000 steel wool, aniline stain, tung
oil varnish, paste wax. |
|
|
|
|
| |
|
|
|
|
|
| |
|
|
|
|
|
Stock Preparation
Like the rocker and
bookcase, the material used in this table is quarter-
sawn white oak. The legs are cut from 8/4 solid stock,
the top from 5/4 material and the rest from 4/4 lumber.
For the drawer sides, you will have to either plane 4/4
stock to 1/2-in. thickness or have your lumber dealer
plane the lumber to the finished size. The same holds
true for the drawer guides, which are 5/8 in. thick.
The panels for the bottom shelf and tabletop are
glued up from narrow boards. Cut stock slightly longer
and a bit wider than required to yield the finished
panel. Edge-joint each piece, then lay out the locations
of the No. 20 joining plate slots every 6 to 8 in. along
the mating edges. Keep the end slots about 3 in. from
the finished ends of the panels.
Use the plate joiner to cut the slots, registering
the cuts against a flat work surface. Then apply glue to
the slots, plates and edges and assemble the panels. Use
clamps to pull the joints tight, then let the glue set
for about 20 minutes. After the glue fully cures, rip
and crosscut the panels to finished dimension.
Joinery
Rip and crosscut the remaining
parts for the table base to finished dimension. Then,
lay out the mortise in the table legs. Use a router with
an edge guide and 1/2-in.-dia. up-cut spiral bit to make
these cuts (Photo 1). Use a sharp chisel to square the
ends of each mortise (Photo 2).
Use a dado blade in your table saw to cut the tenons
on the side and back rails. Since the tenons are 7/8 in.
long, you will have to make two passes for each tenon
cheek. Readjust the blade height to cut the shoulders at
the top and bottom edges of the tenons (Photo 3). Check
the fit of each tenon in its matching mortise.
Mark the locations of the slat mortises in the side
rails. Clamp a tall fence to the drill-press table to
help locate the rails, then bore overlapping
3/8-in.-dia. holes to remove most of the waste (Photo
4). Complete the mortises by smoothing the walls and
squaring the ends with a sharp chisel.
Lay out the joining plate slots on the bottom shelf
and side rails. Use the plate joiner to cut the slots in
the shelf ends, registering the cut on a flat workbench
or on the top of your table saw (Photo 5). To cut the
slots in the side rails, you must use a spacer block
under the plate joiner to yield the proper slot position
(Photo 6).
Before beginning to assemble the base, sand all the
parts with 120- and 220-grit sandpaper, then dust off
the pieces thoroughly. It is much easier to do a good
job of sanding at this stage than it is once the base is
together. |
|
| Use a router with an up-cut spiral bit
and an edge guide to cut the rail mortises in the
table legs. Make several passes.
|
| When the routing is done, carefully
square the ends and flatten the sides of each
mortise with a sharp chisel. |
| Use a dado blade in a table saw to cut
the rail tenons. First cut the cheeks, then readjust
the saw to cut the shoulders. |
| Cut the slat mortises in the rails using
a drill press to remove most of the waste and a
sharp chisel to finish the cuts. |
| Clamp the bottom shelf securely to a
workbench. Then use a plate joiner to cut joining
slots in both ends of the shelf. |
| Clamp the bottom rails to your table saw
fence. Then use a plate joiner to cut joining slots
in one side of both rails. |
|
|
|
| |
|
|
Base Assembly
Position the side slats in
their mortises in one bottom side rail (Photo 7). If the
parts fit properly, you need not apply glue to these
joints, since the slats will be held captive between the
rails. Place the top side rail over the slat ends, then
clamp the assembly temporarily to be sure that the slats
are completely seated in the mortises.
Apply glue to the rail tenons and leg mortises, then
assemble the table side. Clamp the joints tight, then
compare opposite diagonal measurements to be sure that
the assembly is square (Photo 8). Follow the same
procedure for the other side.
Apply glue to the joining plate slots, mortises,
tenons and plates for assembling the shelf and back rail
to the sides. Join the rail and shelf to one side (Photo
9), then place the opposite side over the shelf and rail
ends. Stand the base on a flat work surface and clamp
the joints tight (Photo 10). Check for square.
Use a router with an edge guide to cut a 1/4-in.-deep
x 3/4-in.-wide dado in each drawer guide (Photo 11).
Bore and countersink pilot holes for mounting screws in
the guides, then sand the guides with 220-grit sandpaper
before fastening them to the table legs (Photo 12).
Mark the locations of the tabletop fasteners on the
top edge of the side and back rails. Use a 3/4-in.
Forstner or multispur bit to bore the 1/8-in.-deep
recess for the fasteners. Bore a pilot hole for each,
then attach the fasteners with 1-in.-long No. 8 fh
screws.
Drawers
Cut stock to finished size for the
drawer sides and back, and rip stock for the drawer
face, but don't cut it to length yet. Instead, leave the
drawer face blank about 12 in. long. The drawer sides
are joined to the face with sliding dovetails. These
joints are not difficult to cut, and they provide a nice
compromise when you do not want to invest the time
required for traditional dovetail corner joints. In
order to cut these stopped dovetail slots, construct a
U-shaped jig to guide the router. You can build this jig
by screwing together three strips of scrap lumber or
plywood. The dimensions of these pieces are not
critical. But it is important that the three pieces are
assembled square to each other. |
|
| Test fit the side slats in the rail
mortises. Sand or trim the joints, if necessary, to
achieve a tight fit for each slat. |
| Apply glue to the mortises and tenons,
then clamp the parts. Check for square by comparing
diagonal measurements. |
| To join the sides to the back rail and
bottom shelf, apply glue to the slots and plates,
and to the mortises and tenons. |
| Clamp the side assemblies to the back
rail and shelf and check the parts for square.
Readjust the clamps if necessary. |
| Clamp each drawer guide between bench
dogs. Then rout a 1/4-in.-deep x 3/4-in.-wide dado
in the center of each. |
| Bore and countersink pilot holes in the
drawer guide strips. Then attach them to the legs
with 1-1/4-in. No. 8 fh screws. |
|
|
|
| |
|
|
Set the dovetail bit--we used a Bosch No. 85240--to
cut 7/16 in. deep, then make an indexing cut into the
fence of your jig to make locating your cut easy. Mark
the position of the two slots--along with an end mark
for each slot--on the inside surface of the drawer face,
centered on the length of the face blank. Clamp the face
to the routing jig with the indexing cut centered on one
mark. Slide the router bit into the slot, turn on the
motor and guide the tool along the jig to the end mark
of the slot (Photo 13). Turn off the router and slide
the bit back to the indexing cut to remove it. Repeat
for the other slot. Cut the face to finished length.
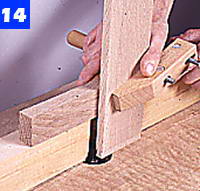
Use the same dovetail bit in the router table to cut
the dovetail shape on the ends of the drawer sides
(Photo 14). For the joint with the drawer back, use a
dado blade in the table saw to cut a simple dado. Then
use a 1/4-in.-dia. straight bit in the router, and an
edge guide, to cut the grooves for the drawer bottom in
the face and drawer sides (Photo 15). Note that the
groove in the face runs only between the dovetail slots.
Use a small backsaw to cut the shoulder at the top of
the dovetail on each drawer side. Then dry assemble the
drawer box to be sure that all joints fit properly. If
all the joints are correct, sand all drawer parts, then
apply glue and reassemble the drawer (Photo 16). Use
brads to reinforce the glue joints between the back and
drawer sides. Then clamp the drawer parts together.
Check that the assembly is square.
Cut the drawer bottom from 1/4-in.-thick plywood,
then slide it into place, and fasten it to the bottom
edge of the drawer back with screws. You can remove the
bottom later to make finishing the drawer easier.
Cut the drawer hanger strips to size, then bore and
countersink pilot holes for attaching them to the drawer
sides. Clamp the strips to the drawer sides, then fasten
them with screws (Photo 17). Finish the drawer assembly
by marking the locations of mounting screws for the
drawer pull. Bore pilot holes and attach the pull.
Assembly
Sand the tabletop smooth with
220-grit sandpaper, then place it upside down on a
padded surface. Invert the base on the top and adjust it
for an even reveal on all sides. Next, mark the
locations of the screwholes for the tabletop fasteners
(Photo 18). Use a clamp to maintain the proper spacing
between the front table legs.
Remove the base from the top and bore pilot holes for
the tabletop fastener screws. Then, replace the base and
install the screws. You'll need a screwdriver with a
magnetic tip to start the screws between the drawer
guides and side rails. Apply the same stain and finish
that's described in "Rocking Chair." |
|
| Rout slots in the drawer face for the
drawer sides with a dovetail bit. Use a square
U-shaped jig to guide the router. |
| Use the same dovetail bit in a router
table to cut both sides of the dovetails on the ends
of each drawer side. |
| Cut a dado between the dovetail slots on
the drawer face for the bottom panel. Cut matching
dadoes in the drawer sides. |
| Apply glue to all the drawer joints,
then clamp the box together. Reinforce the
side-to-back joints with brads. |
| Slide the drawer bottom in place and
attach it to the back with screws. Also, screw the
guide strips to the sides. |
| Center the base over the top and mark
the fastener holes. Then bore pilot holes in the top
and attach the base. |
|
|
|
| |
| |
|